Understanding ISO8583 traces(How the sequence of data sent for a transaction is compiled into a valid ISO8583 message)

Hello Guys,

I’ve had a document describing how this is done for a long time, however i drew it up in MS Word and have not yet found a way to rewrite it as a webpage(I used a sample ISO8583 message and annotated it (You need to set microsoft word to show comments review -> show comments to be able to understand what’s posted there). The document is available preferably here(on Dropbox) or Here on wordpress. I’ve also got sample messages you can try your hand (0100 and 0220)

I’d especially love comments about the document structure and have thus hosted it on my dropbox account so i can modify to make it clearer. Any tips on creating a web-page to communicate this would also be appreciated.

Good luck

Card file generation tool

Hello guys,

We built a card file generation tool to make generating the 7 card files easier. This is especially useful in view of financial institutions that don’t have the expertise/time to build an a tool that generates the card files. The responsible personnel only needs to spool details that most financial institutions should have as part of KYC to successfully populate the card files.

Pre-requisites

  1. Python 2.7 must have been properly installed and configured. You can follow this tutorial

To configure the application for card production

  1. Configure the CardProgram wide settings
    1. This settings are done in the file /Configuration/issuerconfig.conf. The values are described below and should each be separated by a , character. Values with the Nullable column set to No must always be populated. The parameters value can be picked up/understood from the standard specification of the postcard interface specification document
      Var name User Config Specification Nullable
      BIN BIN Numeric 6 digits No
      PANLength PAN length Numeric 2 digits No
      cardStatus Card status Numeric 1 digit No
      currency Currency Numeric 3 digits No
      cardProgram Card Program Alphanumeric <=20 characters No
      discretionaryData Discretionary Data Alphanumeric  <=13 characters No
      cardDuration Duration of Card(years) Numeric 1 digit No
      FINAddress Financial Institution address Alphanumeric <=30 characters No
      FINCity Financial Institution city Alphanumeric <=20 characters No
      FINCountry Financial Institution country Alphanumeric 3 characters No
      mailerDest Mailer destination Numeric <=3 digits No
      FINVIPStatus Financial Institution’s default VIP status Numeric <= 3 digits No
  2. Configure Last Card number generated
    1. This settings are done in the file /Configuration/lastcard.conf This file is populated only during the setup of the application with the first card number in the BIN without the luhn digit. Hence, if the BIN is for a 16 Digit PAN, the value in this file is a 15 digit number. An example of the content for a BIN of 506125 with PAN length of 16 will have a file content of 506125000000000. The content of the file is automatically incremented after successful card file generation to show the lard card generated.

To carry out card production

  1. Place the records to be used in the file /Input/customerrecords.txt. The values are described below and should each be separated by a , character. Values with the Nullable column set to No must always be populated. The parameters value can be picked up/understood from the standard specification of the postcard interface specification document
    Var name Parameters Specification Nullable
    accountID Account Number Alphanumeric 28 characters No
    accountType Account type Numeric 2 digits No
    customerID Customer ID Alphanumeric 25 characters Yes
    cardHolderFName Cardholder first name Alphanumeric 20 characters Yes
    cardHolderMName Cardholder middle name Alphanumeric 10 characters Yes
    cardHolderLName Cardholder last name Alphanumeric 20 characters Yes
    nameOnCard Cardholder Name on Card Alphanumeric 26 characters No
    cardHolderAddress Cardholder address(Populated if it will be unique or 1 if FIN address should be used) Alphanumeric 30 characters Yes
    cardHolderCity Card holder city(Populated if it will be unique or 1 if FIN city should be used) Alphanumeric 20 characters Yes
    cardHolderCountry Card holder country(Populated if it will be unique or 1 if FIN country should be used) Alphanumeric 3 characters Yes
    cardHolderVIPStatus Card holder VIP status(Populated if it will be unique or 1 if FIN default value should be used) Numeric <= 3 digits Yes
  2. Run the application from the command prompt by running the command python CardFileGen.py from the application’s directory. The output of the application are dropped in  /Output/

Github link

Using node name mapping to allow office normalise from 2 postilion servers.

Some clients require the postilion office server to normalise from both their production and DR server.

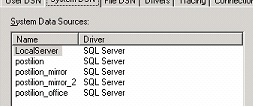
  1. Create an ODBC connection to the second systemI added the postilion_mirror_2
    1. I added postilion_mirror_2
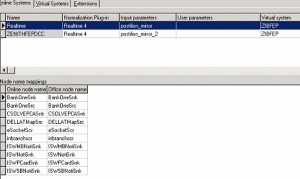
  2. Add the system as an online system in Normalization configurator.Pic 2
    1. the system name is ZenithFEPDCC
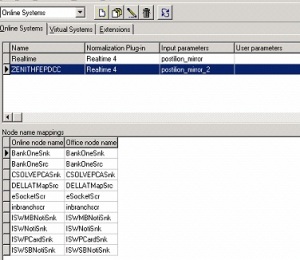
  3. Add all the nodes to both systems(source and sink), mapping them to the same name.Pic 3Pic 4
    1. Alternatively, you could use a script to add them to the table post_online_node_map.

Note that anytime a new node is added on either system, you need to add it to the same table.

You’re done.

How to upgrade the java JRE to version 1.6.43

To upgrade Postilion’s Java JRE version, You’ll require the following

  1. Download and unzip the Java jre
  2. A backup of the java.policy file for the existing JRE. This stores the custom permissions that have been granted to Java classes. The location is %postiliondir%\core\jre\lib\security.
  3. A backup of the jre folder “%postiliondir%\core\jre\”. A rename will be sufficient

To upgrade the JRE

  1. Stop all postilion and the SQL server agent services
  2. Execute the jre_installer.cmd script in the JRE folder you unzipped.
  3. Type Y when prompted to replace the existing JRE version(usually 1.4.2_10).
  4. After conclusion press enter
  5. Compare both java.policy file and copy over any permissions that were in the old one but not in the new one
  6. Add the permission “permission java.lang.RuntimePermission “getStackTrace” as the last permission to enable stack tracing for events(This is necessary to allow easy issue troubleshooting).Note that postilion Patch 641 must have been installed prior to this.
  7. Start all postilion and the SQL server agent services

The rollback procedure is simply replacing the new jre folder with the backed up one.

You’re done

How to fix a download import gone awry

Hello Guys

Ever tried to import a download only to find out ATMAPP wouldn’t start. The error in event viewer usually is

SRSL Syntax Error in @KeybufferName, @Keybuffer, SCREEN DATA X, position Y : The duplicate statement ‘\ ‘ is not valid.

For example at one of my client the error was

SRSL Syntax Error in BANK NEW VERVE NEW KEYBUFFER_SMARTATM+KIM, ACAHAA  , SCREEN DATA 2, position 81 : The duplicate statement ‘\ ‘ is not valid.

Cause

The cause of this error is the invalid characters( ; ) not having been removed from the download application before it was imported.

Resolution

To fix this, you need 2 things,

  1. The Name of the download application that was wrongly imported
  2. The Keybuffer name of the download application

You can get both of them from querying the atm_keybuf table of the postilion db and getting the values of both application and keybuffer.

To delete the application,

  • Run the script below, replacing BANK NEW VERVE NEW NDC_smartatm+kimo with the name of the application

delete from dbo.atm_rsp_info_data
where app = ‘BANK NEW VERVE NEW NDC_smartatm+kimo’
delete from dbo.atm_rsp_info
where app = ‘BANK NEW VERVE NEW NDC_smartatm+kimo’
delete from dbo.atm_rsp_info_descr
where app = ‘BANK NEW VERVE NEW NDC_smartatm+kimo’
delete from dbo.atm_dl_icc_ncr_tran_data
where app = ‘BANK NEW VERVE NEW NDC_smartatm+kimo’
delete from dbo.atm_dl_icc_ncr_secondary_app
where app = ‘BANK NEW VERVE NEW NDC_smartatm+kimo’
delete from dbo.atm_dl_icc_ncr_primary_app
where app = ‘BANK NEW VERVE NEW NDC_smartatm+kimo’
delete from dbo.atm_dl_states
where app = ‘BANK NEW VERVE NEW NDC_smartatm+kimo’
delete from dbo.atm_dl_screens
where app = ‘BANK NEW VERVE NEW NDC_smartatm+kimo’
delete from dbo.atm_dl_loadset_selection
where app = ‘BANK NEW VERVE NEW NDC_smartatm+kimo’
delete from dbo.atm_dl_loadsets
where app = ‘BANK NEW VERVE NEW NDC_smartatm+kimo’
delete from dbo.atm_dl_loadset_groups
where app = ‘BANK NEW VERVE NEW NDC_smartatm+kimo’

To delete the key buffer

  • Run the script below, replacing BANK NEW VERVE NEW KEYBUFFER_smartatm+kim with the name of the keybuffer

delete from dbo.atm_keybuf
where profile = ‘BANK NEW VERVE NEW KEYBUFFER_smartatm+kim’

delete from dbo.atm_dl_app

where keybuf_profile = ‘BANK NEW VERVE NEW KEYBUFFER_smartatm+kim’
delete from dbo.atm_keybuf_profiles
where profile = ‘BANK NEW VERVE NEW KEYBUFFER_smartatm+kim’

You should be able to restart atmapp now and you’ll be fine. Hopefully this didn’t happen on your production systems.

You’re done :D.

How to fix stratus commands throwing errors

When attempting to run stratus ESXi applications in the Ftsys appliance e.g. /opt/ft/bin/ftsmaint(To show the health of all the server’s components) or esxcli mpm storage list( to monitor the Hard disks of the stratus servers are in_sync), you sometimes get an  error e.g.

couldn’t open /var/opt/ft/osm/mgt_port: No such file or directory at /opt/ft/lib/ftsmaint/runCmds.pm line 80.

Causes

The most common cause is a lack of network connection between the Appliance and the host.

  • The IP address of the host could have been changed
  • The Appliance could have been moved to a different vSwitch that doesn’t have necessary access to the host for administration

Resolution

  • Attempt to ping the server from the appliance.
    • If it’s unsuccessful, move the appliance to a vSwitch that has the IP address you used to connect to the host.
  • When pings become successful, run the /opt/ft/sbin/configure-appliance command. It’ll request the IP address of the host and the administrative credentials(root and the password).
    • After the command runs successfully, reboot the appliance(you can power it off and on). The commands should all run successfully now.

How to interpret windows memory dumps(Windows server 2003)

A windows server suddenly restarts in the middle of the night. There are no records of what went wrong as no-one was monitoring. Windows event viewer doesn’t contain any details of what went wrong. Have you considered looking at the memory dump.

The memory dump is a snapshot of what the system had in memory when it crashed. Looking at it gives insight into what was going on on the system at the time the server crashed and often points to what driver/issue caused the crash

Pre-requisites.

  1. You’ll need windbg(the windows utility for debugging).
  2. You’ll need the Symbols file for the Operating system being debugged(windbg can retrieve the symbols for the memory dump if you have internet access on your system).
  3. The memory dump file from the server.
    1. retrieve the file memory.dmp  from %systemroot%. hint.
      1. Location of memory.dmp file
  4. Internet connection(if you haven’t downloaded the Symbols file).

How to go about it.

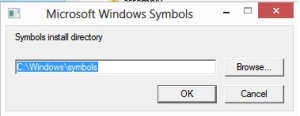
  1. Install symbols for the operating system if you downloaded it. Note the folder you specified as the symbols install directory(C:\windows\symbols).
    1. File
  2. Open Windbg.exe and specify the symbols path
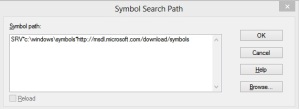
    1. In Windbg, enter CTRL + S to specify the symbols path.
    2. Enter the path to the symbols path here. You can specify that windbg should pull the files from microsoft by specifying the http://msdl.microsoft.com/download/symbols
      1. File
        Specifying that WinDbg should use symbols from the C:\windows\symbols directory or from microsoft’s website.
  3. Read the Memory dump and analyze it
    1. Drag and drop the memory dump file on the open windbg interface. It should show details of the error that occurred and caused the restart.
      1. You can use either !analyze -v or lmv commands to show additional details.
        1. !analyze –v displays information describing the state of a system when it crashed, the fault encountered, and who is the primary suspect.
          1. Look for the line Probably caused by
            1. File
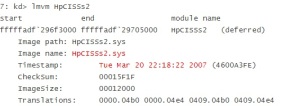
          2. Click on the value of the MODULE_NAME component to see additional details about the driver.
            1. That’s the same as entering the command lmvm HpCISSs2.
              1. File
          3. Investigate from the manufacturer of the driver to see if there’s an update to the driver.
        2. lmv displays a list of drivers and their path, version and vendor information. It often includes a product description. You use this to find additional details about a driver if !analyze -v indicates the driver that caused the crash.
  4. Investigate using the result of the previous step.
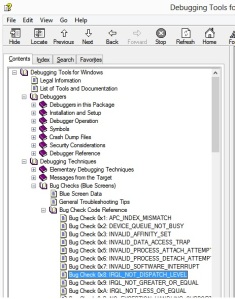
    1. Get the value of the BUGCHECK_STR and reference the WinDbg help file(F1)  to understand what caused the error
      1. File
      2. File
    2. Consult google for additional details

References: Technet, MSDN, NetworkWorld, Microsoft

Support Trivia

Question: A client complains that an international transaction( from Djibouti) is failing with 05. The client has Acquire country velocity configured. What could be the cause of the failure.

Answer: The card program doesn’t have the country configured. Log on to the ACVP confirguration and add the country to the card program.